Thursday, April 18, 2013

Wratchel's Flourless Pumpkin Muffins

makes 18 muffins, photo by Rashel F
This nutritional label was created by me. I measured ingredients by weight, researched them at the National Agricultural Library, and configured the information into this chart.
The genesis of this muffin came from my need for a low-glycemic muffin that also contained loads of real food that were beneficial to my body. Here is a break down of the ingredients and why I chose them:

Oat Flour: high in fiber, low-glycemic (keeps the blood sugar stable, thereby keeping cravings and
     fat storage at bay)
Spices: for taste
Eggs: a decent source of omega-3 fatty acids and a great source of protein
plain Greek Yogurt: adds moisture to the muffin while keeping the sugar low and the protein high
Pumpkin: adds moisture, flavor, fiber, and vitamins
Flax Seed: high in omega-3 fatty acids, fiber, and lignan
Chia Seed: holds moisture in the muffin and contains omega-3 fatty acids and fiber
Dried Cranberries: packed with vitamins and adds texture and sweetness
Chocolate Chips (six per muffin, placed by hand): adds sweetness and helps with the chocolate fix ;)
Splenda: I eat real food...most of the time. But Splenda has not found itself shut out yet. Maybe
     someday.This sweetener gives a perfect sweetness without any glycemic effect.

So, in a nutshell, I wanted a healthy muffin with lots of fiber and diverse flavors. This one hit the mark, although, I may leave out the dried cranberries next time.

Ingredients
2 1/4 C oat flour
3/4 t baking powder
3/4 t baking soda
3/4 t salt
1 1/2 t cinnamon
1/4 t nutmeg
1/8 t ginger
1T flax seeds
1 T chia seeds
2 eggs plus 1 egg white
3/4 C unflavored greek yogurt
1 1/2 C pumpkin puree
1/2 C Splenda
1/3 C dried cranberries
108 chocolate chips (approx 6 T)

Directions
1. Preheat oven to 350 degrees and coat muffin pan with non-stick spray.
2. In a large bowl, mix oat flour, baking powder, baking soda, salt, spices and flax & chia seeds.
3. In a medium bowl, gently beat the eggs until uniformly mixed.
4. Mix the yogurt into the eggs well.
5. Stir in the pumpkin and splenda.
6. Pour the wet ingredients atop the dry and gently stir, scraping the sides as you do. Just before the dry ingredients disappear, fold in the cranberries.
7. Do not stir anymore.
8. Using a 1/4 cup measuring cup, place 1/4 cup of the mixture in each muffin tin. It will come close to making 18 muffins.
9. Place 6 chocolate chips atop each muffin.
10. Place on center rack in your oven and bake for 12 minutes each.
11. Remove and let sit for 5 minutes. Remove from pans and let cool on a rack.


Thursday, September 13, 2012

Cinnamon Banana Oatmeal


Ingredients:
1/2 C cooked oatmeal, Old Fashioned
1 T agave syrup
1/2 medium banana
a sprinkle of cinnamon-sugar

Directions:
Cook oatmeal as directed on package.
Top with agave, chopped banana, and cinnamon-sugar.

Nutrition Facts Table from Livestrong.com
Recipe by Rashel Fitchett

Benefits of this meal:
  • Low in fat, cholesterol, sodium.
  • A source of vegetable protein.
  • High in fiber. 
  • Provides energy for high-exertion exercise (running, biking, swimming).
Not-so-benefits of this meal:
  • High in sugars. (Remove Agave and Cinnamon Sugar to reduce)

Friday, September 7, 2012

Red Velvet Cake...How-To Photos

Red Velvet Cake
Red Velvet Cake, Baked and Photographed by Rashel Fitchett

Red Velvet Cake is different than most cakes which call for milk and butter. Red Velvet Cake calls for buttermilk, a large amount of oil, vinegar, and red food dye. The buttermilk and vinegar give this cake a slight "tang", the oil gives it a more moist consistency, and the food dye...well, we all know Red Velvet Cake is supposed be....red.

Here is a recipe for Red Velvet Cake that makes a large, three-layered, cake.

Dry Ingredients:
3 3/4 C unbleached, all purpose flour
3 C flour
6 T cocoa powder
1 1/2 t salt
1 1/2 t baking soda

Wet Ingredients (at room temperature)
3 eggs
2 1/2 C canola oil
1 1/2 C buttermilk
1 1/2 T vinegar
1.5 t vanilla
2 oz red food coloring

Directions (see below for a pictorial, step-by-step)
1. Get out all ingredients. Let the wet ingredients sit for 30 minutes or until they are at about room temperature (you'll get a better lift of your cake batter if you do).
2. Preheat oven to 350 degrees.
3. Grease and flour three round cake pans.
4. In a large bowl, mix dry ingredients with a whisk for 3 minutes.
5. In another large bowl, add wet ingredients as follows:
          -lightly beat eggs
          -slowly add oil into eggs while stirring with a whisk
          -slowly add buttermilk while stirring with a whisk
          -add vinegar, vanilla, and red food coloring all at once
          -stir with whisk for about 1-2 minutes, no lumps should be left behind
6. Pour about 2 1/2 C of the batter in each of the three prepared pans, using all the batter equally amongst them.
7. Arrange all three pans in the preheated oven so than none are touching the edges of the oven and with a space in between all pans. If they don't fit, first bake two, then bake the third.
8. Bake for 30 minutes.
9. Remove from oven and let sit in their pans for 10 minutes to cool.
10. Remove your cake from the pan, using the plate-flip method, and let sit on wire cooling racks to cool completely.
11. Wrap in plastic wrap and tin foil and freeze for easier icing later.

 Here are my ingredients coming to room temperature.

 I prepare cake pans by wiping with crisco and dusting with flour.

 Whisking dry ingredients aerates the flour, giving your finished cake "bounce".

I gently beat my eggs with the whisk.

 Slowly add the oil, stirring as you pour. This incorporates the fat evenly in the protein.

 Add the buttermilk in the same way. This is where the "wet" part comes into play.

 Add the vinegar, vanilla, and color. Jeez, this is red!

 Add the wet to the dry.

 Stir well, getting rid of large lumps.

Evenly distribute the batter amongst the three pans.

 After 30 minutes of baking in the oven, let them rest in their pans for 10 minutes.

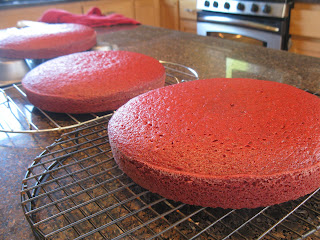
Then, cool them completely on racks. See than nice rise to the tops...that is that room temperature thing  ;).

I'll be wrapping these in plastic wrap and tin foil and then freezing them so that later, when I ice them, they are hard and don't fall to crumbly pieces as I am pushing the cream cheese frosting across the tops and sides. More on that later.......

Wednesday, September 5, 2012

Cake Pops


I needed to learn to make cake pops for my daughter’s 16th birthday party. It was a must, to have cake pops at the party, due to their famous presence at local bakeries and coffee shops.

Too expensive to purchase 150 of these sweet little concoctions, I turned to my own resources to get the job done. In this particular case, I used Google, Pinterest, YouTube, & AllRecipes.com to eventually find video, which really helped me figure out how to dip these suckers in frosting.

First, went out and purchased Babycakes Cake Pop Baker. I got mine at Michaels with a 50% iPhone App coupon for a total of $15.00.   


Then, I chose the cake recipe. I went with Hershey’s “Perfectly Chocolate” Chocolate Cake . I halved the recipe and it made 57 cake pops. In the picture, here, notice I placed the cake batter in a picnic "ketsup" bottle. It made it particularly easy to get the batter in those little dome shaped molds. You can use a plastic sandwich bag, too, with a corner snipped off.


 Be sure to fill it just below the fill top of the mold. If you fill them even, they puff up too much, like in the picture below, and they will come out with a crispy ring attached.


I used Baker's Joy before each batch and the cake pops came out really easily with the tongs that come with the cake pop maker. I baked these 4 minutes flat. They were perfectly baked and not dried out. I laid them on a wire rack to cool. 

Here they are, finished, and waiting for their lollipop sticks. I used 6 inch sticks. 

For frosting, I went with my own thoughts on that: 4 C confectioner’s sugar, 3 T butter, enough milk to create a soft consistency, and corn syrup to make it more thin and shiny. Before you stick the stick into the pop, dip the end in the frosting. This keeps the pop from falling off later when you dip them.


 Be careful not to push the stick more than halfway through the pop. If you go further than halfway, you are risking that the stick will later "pop" out the top of your pop. Ick. See further below for an example of that.

 Now its time to freeze them. I put mine in freezer bag, arranged flat like above, on a cookie sheet, then I placed them in a chest freezer for 30 minutes. This makes the cake hard and will help you when you are dipping them.

 When you choose a vessel for your frosting, choose one that is tall and skinny. But not so tall that you can't reach all the way to the bottom with your cake pop. I used a syrup pourer. Review this video for tutorial on how to dip.


I took each pop out of the freezer individually, dipped them in the frosting, sprinkled the pop with sprinkles, and then set them to dry here in this box that I punched with holes. I used a metal skewer and it turned out just about the right sized hole. Keep warming your frosting between pops. The thinner the frosting, the less chance that your pop will get too heavy and fall down the stick.

 Here is an unfortunately soul who fell off his stick :(.


  And finally, I used the remaining frosting to make one last attempt at decor on the pop.

I tried, also, dipping them in chocolate melts...which are much different than dipping them in chocolate. Chocolate has A LOT more sugar and ends up making it too sweet. Chocolate melts, however, have more waxy-product and less sugar, making it taste chocolately, keep its candy-coating-ness, and not taste so sweet. I used, here, Simply Melt. It tasted better than the icing I made, but I need white cake pops, so I may need to try white melts. Hmmmm.

Tuesday, June 5, 2012

Chocolate Dessert with Peanut Sprinkles

Chocolate Dessert with Peanut Sprinkles

          Eat this chocolate dessert when you need a chocolate treat, but you would like to eliminate the high sugar content that comes along with other chocolate yummies like pudding and ice cream. The sugar in this dish is only from the milk product. The real kicker on this dessert: it includes a whopping 17 grams of protein! When you are not eating chocolate and NEED some...try this. 

Nutrition Information:

Calories: 165
Fat: 8 grams (monounsaturated)
Cholesterol: 0 mg
Sodium: 43 mg
Carbohydrates: 11 grams
     Sugar: 6 grams
Fiber: 2 grams
Protein: 17 grams

Ingredients:

1/2 Cup 0% Fage Yogurt
1 Tablespoon Splenda
1 Tablespoon Cocoa Powder
1/2 oz Crushed Peanuts, Unsalted

Directions:

1. Mix yogurt with splenda until smooth.
2. Fold in cocoa and then mix briskly until smooth.
3. Crush peanuts with the flat side of a large knife and sprinkle atop the chocolate mixture.

Tuesday, March 27, 2012


Homemade Potato Chips


Homemade Potato Chips sounded like a good idea. My husband had recently suggested we drop processed snacks from the grocery list and I obliged. As a result, I found myself baking and cooking snacks from scratch so that my kiddos could still enjoy a treat now and then.

Homemade Potato Chips was among the list.

The picture and recipe, which I found on a blog named food for my family, was enticing and simple. Whole food and ingredients was the draw for me.

So, I got right to work.

I gathered my ingredients: Potatoes, Olive Oil, Sea Salt, my food processor, two baking sheets, & parchment paper.

Easy, breezy!

I preheat the oven to 400 degrees (convection). Easier yet.

I sliced the potatoes, brushed them lightly with the oil, and salted them. All is good.


I baked them just as the recipe below called for.

Then a problem occurred. Some were turning brown, really brown on the edges, but staying soft in the middle. When we tried the first batch, they tasted really good….as long as the brown didn’t get too big. The mild softness in other parts of the chip wasn’t a problem, but my mind went straight to food safety rule regarding cooked potatoes at room temperature.

According to the Center for Science in the Public Interest “The most common produce items associated with outbreaks [of food-born illness] are greens-based salads, lettuce, potatoes, unspecified fruits and sprouts”(OUTBREAKS BY THE NUMBERS: FRUITS AND VEGETABLES, 1990-2005). The Washington State Food & Beverage Workers’ Manual suggests keeping cooked potatoes out of the danger zone (41-140 degrees) for extended periods of time to avoid illness from a potato. The recipe, on the other hand, called for these somewhat soft chips to be stored in a air-tight container*.

So, my concern was that with an unevenly cooked potato, I would need to refrigerate the chips to keep them safe. The really brown, crispy part would be safe, like from a bag of Lay’s chips from the store. But the soft part…that would be like keeping potato salad on the counter for a day or so then eating it. The chips would have to be kept cold.

I tried turning off the convection oven and to no avail. Still the same result. 

My final decision about the Homemade Potato Chip….unless we were going to consume the chips immediately and until I find a way to cook them evenly, we’ll just be leaving them out of the regular family diet all together. Who wants to eat refrigerated potato chips?


(directions as listed on the above named blog)
2 pounds potatoes
1/4 cup olive oil
sea salt

Preheat oven to 400° F. Using a mandoline or vegetable peeler, shave potatoes into very thin slices. Lay slices onto parchment-lined baking sheets. Brush lightly with olive oil on both sides and sprinkle lightly with sea salt.

Bake at 400° F for 15 minutes or until potatoes start to turn golden on one side. Flip the slices and continue baking for another 7-10 minutes. Flip again and bake until potatoes are golden brown and crisp, another 5-10 minutes. Cool slightly and serve warm or cool completely and
store in airtight container*.

Makes 6 cups potato chips.

Monday, March 19, 2012


Vegetable Picorino Skillet


Ingredients:
safflower oil
red & green peppers 1/2 cup chopped
carrots 1/4 C finely chopped
Braising Mix 1 Cup (kale, leafy greens, swiss chard)
brussels sprout 1 finely sliced
mushroom 1 chopped
picorino cheese
sea salt
black pepper

Directions:
Heat safflower oil in an iron skillet over medium low.
Add peppers and carrots & saute for 3 minutes.
Add kale and brussels sprout & saute 1 minute.
Add mushroom & saute 1 minute.
Remove from heat and season with sea salt, black pepper, and picorino (or parmesan) cheese.
Serve with an egg on the side if desired.